Crayola Colored Pencils And Petroleum Jelly: A HCWT Coloring Tutorial
*Any links to supplies found on Amazon are affiliate links. Should you decide to bring home an art tool I’m talking about and purchase it through the links found here, a few pennies of that purchase are distributed to me. It isn’t much, but it (slowly) adds up—it’s a lovely way to support the content that I create, and it comes at no cost to you, which is awesome, too. Thanks, in advance, to anyone who supports my art in this way; I really appreciate it!
Folks ask me about colored pencils...a lot.
Which colored pencils are good for budding artists? Which colored pencils are the best bang for your buck? Which colored pencils are the smoothest? Which colored pencils are the easiest for older hands or younger hands? Which colored pencils work the best?
And, I have answered all of these questions to the best of my ability many, many times. But, honestly, WHICH colored pencil you color with isn't always as important as HOW you are using that particular colored pencil.
Yes, IMHO, Faber-Castell's Polychromos are currently the gold standard in traditional colored pencils (there will be a review on those and other art goodies I have collected over this year in the next episode of the Coloring Nerd's Supplies Guide), but you can create beautiful art with the most humble of colored pencils, the tried and true Crayola Colored Pencil, especially when you've got a few tricks up your sleeve!
There is one trick in particular that I want to share with you about coloring with Crayola Colored Pencils (or any other inexpensive colored pencils: RoseArts, Marco Raffine, Arteza, etc.): magic things happen when you dip them into regular old petroleum jelly!
That's right, adding the bittiest amount of Vaseline or any other petroleum jelly to the tips of your Crayola Colored Pencils is a coloring game changer! And, I walk you through the process in this, my first honest-to-goodness coloring tutorial.
I say that the above YouTube video is my first "honest-to-goodness" tutorial because for the first time ever I am TALKING you through an art technique rather than just showing you with text and photos.
This was a leap for me, talking to the camera, to my audience, and I was incredibly nervous about it. But, the concept of using petroleum jelly with colored pencils is a little involved, so it seemed best for me to get over my camera-shyness and just go for it.
That does mean, however, that this tutorial is my longest art video to date,12 minutes, AND you need to have your sound on in order to get the full lesson.
So, for folks who are short on time and might be viewing this blog post where you would rather your technology did NOT have the sounds of my voice coming from it (although Steve, upon watching this coloring tutorial, did say that I have a rather "Bob Ross" calming quality to my voice, so there is that), I'm adding snapshots of this super fun technique's process as well.
The video above and the text/photo instructions below were created to compliment each other, not duplicate each other, so if you have time for the full Have Color Will Travel coloring tutorial experience, I hope you enjoy the entire lesson!

Step 2: Color! It is going to feel weird to put something as oily and goopy down onto a coloring page your heart wants to color, but trust me: it will all turn out great! If you are really nervous, get out some test paper and play around a bit before taking this technique to your coloring books, cards or bookmarks:)

Step 3: Keep coloring! You will notice your pencil glides over the surface of your paper; that's the oil working. You will also notice the tip of your pencil getting smooshy; that is the petroleum jelly working to soften your pencil's color core. You are smoothing softened color core across your page, so the end result is a deeply saturated color on your paper that looks more like marker than it does colored pencil.

Step 4: Clean off the tips of your pencils whenever you finish using a color! Any petroleum jelly left on your pencil continues to soften its color core, so cleaning off your pencils after use is a must.

Step 5: Try some color blending! Have a bit of petroleum jelly on a pencil or two and softly color back and forth between the two colors on your page. I chose to do a varying pressure technique between light blue and violet, and I love how it turned out! Notice I kept my pencils on my paper towel, though; once your pencils have petroleum jelly on them, they are rather like markers with their caps off, and they are bound to get color where you don't necessarily want it to go. Coloring on a protected surface or one that you use for such creative adventures is a good choice; this coloring technique is NOT for your fine dining table or plushly upholstered couch!

Step 6: Tidy up! This little section from one of my new colorable cards in the Dancing Amoeba Garden collection was all I had time to color on the day I was prepping photos for this coloring tutorial. After I finished coloring this little mouthy flower monster, I cleaned up all my pencils and I took a close look at my coloring page to see if there were any tiny blobs of petroleum jelly sitting on the top of the paper (they glisten nicely in the light, so you can see them). I then gently blotted those blobs with a clean bit of my paper towel. Left alone those blobs will eventually "dry," however I have very curious and jumpy felines who love to explore my studio, so I wanted to be sure to leave nothing to chance - blobs of color/petroleum jelly will smear and possibly stain whatever they come into contact with.

I hope you've enjoyed this mixed media coloring tutorial and that you will explore the idea of using petroleum jelly with inexpensive colored pencils yourself at home, soon! Even better, I hope that you will share this idea with friends and family at your next coloring party; fabulous conversations and creations happen when we share our creative knowledge with the folks we care about!
 |
| All the ingredients you need to have some creative fun on the cheap: Crayola Colored Pencils, generic petroleum jelly, a pencil sharpener, something fun to color (pictured here is one of my new colorable cards from my Dancing Amoeba Garden collection), and a clean paper towel. |
Folks ask me about colored pencils...a lot.
Which colored pencils are good for budding artists? Which colored pencils are the best bang for your buck? Which colored pencils are the smoothest? Which colored pencils are the easiest for older hands or younger hands? Which colored pencils work the best?
And, I have answered all of these questions to the best of my ability many, many times. But, honestly, WHICH colored pencil you color with isn't always as important as HOW you are using that particular colored pencil.
Yes, IMHO, Faber-Castell's Polychromos are currently the gold standard in traditional colored pencils (there will be a review on those and other art goodies I have collected over this year in the next episode of the Coloring Nerd's Supplies Guide), but you can create beautiful art with the most humble of colored pencils, the tried and true Crayola Colored Pencil, especially when you've got a few tricks up your sleeve!
There is one trick in particular that I want to share with you about coloring with Crayola Colored Pencils (or any other inexpensive colored pencils: RoseArts, Marco Raffine, Arteza, etc.): magic things happen when you dip them into regular old petroleum jelly!
That's right, adding the bittiest amount of Vaseline or any other petroleum jelly to the tips of your Crayola Colored Pencils is a coloring game changer! And, I walk you through the process in this, my first honest-to-goodness coloring tutorial.
I say that the above YouTube video is my first "honest-to-goodness" tutorial because for the first time ever I am TALKING you through an art technique rather than just showing you with text and photos.
This was a leap for me, talking to the camera, to my audience, and I was incredibly nervous about it. But, the concept of using petroleum jelly with colored pencils is a little involved, so it seemed best for me to get over my camera-shyness and just go for it.
That does mean, however, that this tutorial is my longest art video to date,12 minutes, AND you need to have your sound on in order to get the full lesson.
So, for folks who are short on time and might be viewing this blog post where you would rather your technology did NOT have the sounds of my voice coming from it (although Steve, upon watching this coloring tutorial, did say that I have a rather "Bob Ross" calming quality to my voice, so there is that), I'm adding snapshots of this super fun technique's process as well.
The video above and the text/photo instructions below were created to compliment each other, not duplicate each other, so if you have time for the full Have Color Will Travel coloring tutorial experience, I hope you enjoy the entire lesson!
How To Use Petroleum Jelly With Inexpensive Colored Pencils
(I'm Using Crayolas)
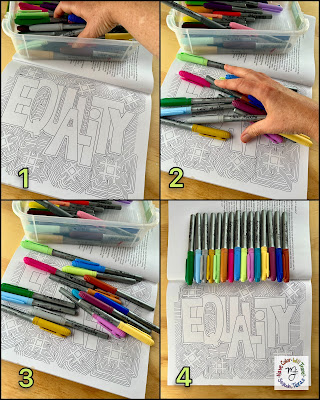
Step 1: Gently dip your color of choice into the tub of petroleum jelly. A little goes a long way, but be sure the pencil's tip is covered.

Step 2: Color! It is going to feel weird to put something as oily and goopy down onto a coloring page your heart wants to color, but trust me: it will all turn out great! If you are really nervous, get out some test paper and play around a bit before taking this technique to your coloring books, cards or bookmarks:)

Step 3: Keep coloring! You will notice your pencil glides over the surface of your paper; that's the oil working. You will also notice the tip of your pencil getting smooshy; that is the petroleum jelly working to soften your pencil's color core. You are smoothing softened color core across your page, so the end result is a deeply saturated color on your paper that looks more like marker than it does colored pencil.

Step 4: Clean off the tips of your pencils whenever you finish using a color! Any petroleum jelly left on your pencil continues to soften its color core, so cleaning off your pencils after use is a must.

Step 5: Try some color blending! Have a bit of petroleum jelly on a pencil or two and softly color back and forth between the two colors on your page. I chose to do a varying pressure technique between light blue and violet, and I love how it turned out! Notice I kept my pencils on my paper towel, though; once your pencils have petroleum jelly on them, they are rather like markers with their caps off, and they are bound to get color where you don't necessarily want it to go. Coloring on a protected surface or one that you use for such creative adventures is a good choice; this coloring technique is NOT for your fine dining table or plushly upholstered couch!

Step 6: Tidy up! This little section from one of my new colorable cards in the Dancing Amoeba Garden collection was all I had time to color on the day I was prepping photos for this coloring tutorial. After I finished coloring this little mouthy flower monster, I cleaned up all my pencils and I took a close look at my coloring page to see if there were any tiny blobs of petroleum jelly sitting on the top of the paper (they glisten nicely in the light, so you can see them). I then gently blotted those blobs with a clean bit of my paper towel. Left alone those blobs will eventually "dry," however I have very curious and jumpy felines who love to explore my studio, so I wanted to be sure to leave nothing to chance - blobs of color/petroleum jelly will smear and possibly stain whatever they come into contact with.

I hope you've enjoyed this mixed media coloring tutorial and that you will explore the idea of using petroleum jelly with inexpensive colored pencils yourself at home, soon! Even better, I hope that you will share this idea with friends and family at your next coloring party; fabulous conversations and creations happen when we share our creative knowledge with the folks we care about!

I agree with Steve; your voice is very soothing to listen to and I enjoyed your tutorial video and blog. This reminds me that I don't need to spend more funds on fancy coloring supplies-- I can just snag a tub of Vaseline and go to town with my Crayolas!
ReplyDeleteAbsolutely! Art can be made on any budget:)
Deletethanks for sharing this info with us!
ReplyDeleteYou’re most welcome! Thanks for reading, and happy coloring!🌈
Delete