How To Create Backgrounds For Coloring Pages With Crayons & Petroleum Jelly (And Solve The Problem Of Too Much Whitespace!)
For months now I’ve been exploring the fascinating combination of two simple ingredients: elementary school crayons (specifically Crayola crayons) and petroleum jelly (PJ for short).
 |
| All the supplies you need for some crayon coloring fun are probably lying around your house! Fancy coloring one of my HCWT colorable cards? Take a look at all five collections HERE. |
Why Crayons & Petroleum Jelly?
I fell down this creative rabbit hole thanks to a question many folks submitted to my Using Petroleum Jelly With Colored Pencils YouTube tutorial: Does this trick work with regular crayons? Well, I didn’t know the answer to that question, so of course I had to do some art-science experimenting straight away to find out! My investigations resulted in a super interesting two part art exploration video series over on my YouTube channel.
Part one dove deep into different applications methods of crayons with PJ onto regular adult-style coloring book paper (as opposed to old-school coloring book paper which is more like newsprint). Surprisingly, how one applied PJ with crayons made a big difference on the effectiveness (or lack thereof) of the technique regardless of the color used. I’m sharing the video of this beginning exploration for all you coloring art nerds out there to enjoy, but it is just under 30 min (I tested A LOT of application methods and cross tested that with different color families), so if getting into creating some beautiful coloring page backgrounds right away is your goal with reading this article, just put the video in your watchlist for later to enjoy with a cup of coffee or tea!
In part two I went on to explore how PJ might either help or hinder color blends/gradients made with crayons. This video is slightly shorter (18 min), so again, for folks wanting to get straight to learning how to create crayon and PJ backgrounds, pop it in your YouTube watchlist for later—you don’t want to miss it—creating gradients with crayons is so satisfying with PJ!
And it was in this part two segment that I stumbled on to what I consider to be my most exciting coloring discovery from this entire wild journey: mixing crayons and PJ together can create GORGEOUS backgrounds for coloring pages with loads of white space!
Making Coloring Page Backgrounds With Crayons & Petroleum Jelly
I love coloring, but I do NOT enjoy coloring in whitespace backgrounds even on coloring experiences I myself have illustrated. Which is why I was so excited to discover the magic that is combining grade school crayons and petroleum jelly. Throw in a couple of cotton swabs and you’ve got an easy, relaxing, and rather swift mixed media coloring technique that’s not only super fun to do but also one that finishes up looking absolutely lovely! Scroll to the bottom of this section of the article if you’d like to jump right into the YouTube tutorial I created showing how this awesomeness is done, otherwise keep reading for the step-by-step in pictures & words tutorial on how to create delightfully unique backgrounds on your coloring pages with items you probably have lying around your house right now!
 |
| I chose to color the background of this card from my Flower Power colorable card collection with swirls to echo the many wonky circles of the vase. |
Supplies needed:
- Crayons (I’m using Crayola)
- A tub of petroleum jelly (PJ for short) meant only to be used for art projects
- Cotton swabs
- Scrap paper
- A protected flat surface on which to color (remember: PJ is goopy & oily)
- Something awesome to color
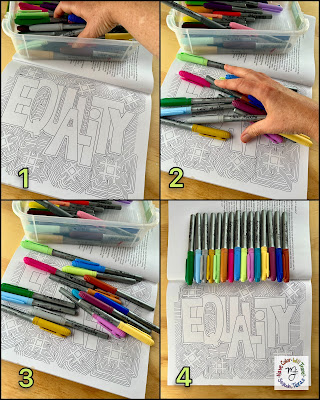
STEP ONE: On your scrap piece of paper color down individual squares (or whatever shape you prefer) of crayon color of all the colors you wish to use on your coloring page’s background (I chose a collection of jewel tones). Be sure to use the hardest pressure your hands can tolerate!
 |
| Coloring hard is the goal for creating the swatches with this technique, so if you’ve got a ‘heavy hand’ when you write or color, feel free to let your pressure go as hard as your heart desires! |
If you end up with loads of ‘crayon dust’ from pushing down so hard on your crayon, DON’T BLOW IT AWAY! That ‘dust’ is the pigment you are going to use on your coloring page.
On this bit of scrap paper you are creating a sort of paint palette for your coloring project. When you are done your palette should look something like the one I created which is on the right hand side of the photo below.
 |
| I used jewel tones for this project, but my crayon and PJ experiments taught me that most colors in a Crayola 120 box work pretty well with this technique. |
STEP TWO: Get a fresh cotton swab and gently dip it into your tub of PJ. Coat the tip of the swab with PJ but try to avoid picking up a thick glob of it. Too little PJ and no magic will happen, too much and you will have an oily mess on your crayon palette.
 |
| I found creating a little well in my PJ tub to be helpful. It made it easier for me to get just the right amount of PJ (not too much and not too little) onto the swab tip. |
STEP THREE: Imagine this PJ coated cotton swab is like a paintbrush and scrub (yes, SCRUB—you need to exert some force here) the swab tip along a color square from your crayon pigment palette.
 |
| Rather than holding the cotton swab like a pencil pinch the swab stick and scrub the PJ coated tip into your color swatch. This will help you avoid bending the flimsy swab stick in two. |
As you scrub the cotton swab along the color swatch square the PJ on the swab begins to soften the crayon pigment allowing you to pick up color onto the swab, a la a paint brush dipped in paint! After a few moments of doing this, the your cotton swab will become coated in color. Take this color and apply it to your coloring page however you wish—in streaks, dots, swashes, zigzags, blankets of color! Use it as you would any other kind of coloring tool, but remember: because the head of a cotton swab is bluntly round and fibrous, color lays down onto paper with a bit of natural texture when you use this technique. Its up to you to decided what to do with that added texture and depth!
As you can see from the photo below, I chose to apply the crayon pigment in swirls, scumbling my cotton swab in tiny circles over and over. I was going for a cloud like effect, hoping for an airy jewel tone background.
 |
| The texture scumbling with this technique creates is so fun! It reminds me of cotton candy or tumbling piles of colorful embroidery floss. |
I absolutely love the gentle texture this technique created on my coloring page! I could have created a similar color gradient with colored pencils or markers without a doubt, but doing so would have taken me WAY longer to complete in an interesting way (this took me about 20 min from start to finish, and that timing included taking WIP photos and capturing video for y’all). Gradients made with those two more traditional coloring tools would also not have had that swirly, circle-y texture to them that I adore, which makes this technique worth giving a try in my book.
Pictures may be able to speak 1000 words, but actually listening to me talk you through this coloring technique while seeing it in action is, in my opinion, the best of both worlds. Below is a full process video (running time: 5 1/2 mins) of me creating this beautiful crayon and PJ coloring page background for everyone who loves watching an art process before giving it a go themselves.
Pro-tips and Final Thoughts
Should you decided to give mixing up crayons and PJ a try, here are a few pro-tips I learned during my months of playing with this coloring combo:
- Have a dish or spare bit of wax paper (I used the lid to my petroleum jelly tub) out on your coloring surface for you to place oily coloring cotton swabs on as you play around with different colors. It will keep the PJ where it should be (on the swab and your coloring page) rather than letting it migrate to where it shouldn’t (your clothes, furniture, etc.)
- Remember that coloring experiences created with PJ will take some time to dry/cure (usually a day or two depending on the weather). If you’re coloring a card like I did in this tutorial, be sure to let it dry before you send it off in the mail to avoid oil stains on your envelope. If you are coloring a full size coloring page using a PJ art technique and you wish to frame your coloring art (which I highly encourage), give it ample drying time before placing your piece behind glass or plastic to avoid fogging. Coloring art made with PJ will feel dry to the touch (unlike the tacky feel it has when you’ve just finished coloring) when it is ready to be mailed off or framed.
- Be sure to wipe down your crayons fully once you’ve come to the end of your art session IF they’ve come into contact with PJ. Petroleum jelly softens paraffin wax based art supplies (which crayons are), and if it is left in contact with your crayons, it will continue to soften them until the PJ residue dries out.
 |
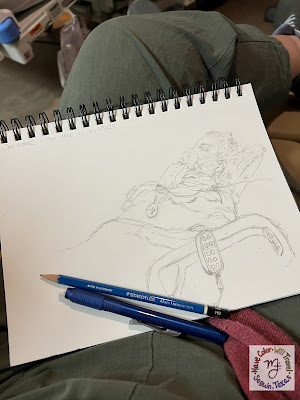
| I’m constantly asking “What if?” question with my art practice, but often I don’t give myself the time to follow that curiosity. 2023 is the year that I make time for answering those questions! |
So, of course I had to prepare a page in one of my sketchbooks (I used a Canson XL Mixed Media Sketchbook, one of my favorites) with a bunch of crayon and PJ swatches (also applied with cotton swabs) so that I could test out some of my favorite art tools on top of them and see what happens!
After letting this collection of swatches dry thoroughly (I got really busy with school in the midst of this experiment, so these swatches dried for weeks rather than days), I pulled out a ton of tools (Precise V5 roller ball pen, Bic Marking permanent marker, glitter gel pen, Sakura Gelly Roll gel pen, Mungyo Gallery oil pastel, Faber-Castell Polychromos colored pencil, Caran D’Ache Neocolor I wax pastel, Stabilo Woody 3-in-1 colored pencil, and Prismacolor watercolor pencil), and got to experimenting. And, oh.my.goodness.—the results were SO interesting! Lucky for y’all I decided to capture quite a bit of the exploration on video, so I edited my art science afternoon into swift 6 1/2 min video for y’all to enjoy and hopefully be inspired by!
I probably won’t have much time for taking all that I learned from these crayon and petroleum jelly art explorations and putting it to use on my coloring pages any time soon as my new semester of formal art education has begun (this semester I’m taking Drawing II and Ceramics I—twice as many classes as I took this past fall), but I’m still so very glad that I decided to follow my curiosity. If I hadn’t given time to my “What if…?” questions, I would have never discovered such hidden secrets about my art supplies like how spectacularly Stabilo 3-in-1 Woodies color over simple things like crayons and PJ! I mean just look at that swoosh below—that texture is so dreamy!
 |
| Be sure to pinch and zoom on this photo to check out the fabulous texture a Stabilo 3-in-1 colored pencil creates on top of a crayon and petroleum jelly background! It’s so cool! |
If you try out any of these wild art making suggestions on your coloring pages or traditional art projects, do reach out to me and let me know how it all goes for you! The best way to do that if you are a HCWT newsletter subscriber is by responding to any newsletter email you receive with photos of your crayon & PJ art—your email will come directly to me. And, if you’re more comfortable sharing your coloring art with me on social media, tagging @havecolor_willtravel on Instagram or Have Color Will Travel on Facebook should make it possible for me to check out your artwork (but that depends on your account’s privacy settings and whether or not the photo you share is set to PUBLIC).
This was a truly deep dive into crayons and petroleum jelly, I know, BUT if after all this you find yourself asking a question I didn’t answer, pop it in the comments below and I will do my level best to get you an answer! As always, thanks for stopping by my colorful corner of the internet and joining me on another one of my curiosity journeys—happy coloring, y’all!
*This is a reminder that any shopping links to Amazon or Blick Art Materials found in this post are affiliate links. Should you decide to bring home something I’m talking about and purchase it through the links found here, a few pennies of that purchase are distributed to me. It isn’t much, but it (slowly) adds up—it’s a lovely way to support the content that I create on HCWT, and it comes at no cost to you, which is awesome, too. Thanks, in advance, to anyone who supports my art & writing in this way; I really appreciate it!*

Comments
Post a Comment